
5 Make-Ahead Freezer-Friendly School Lunches
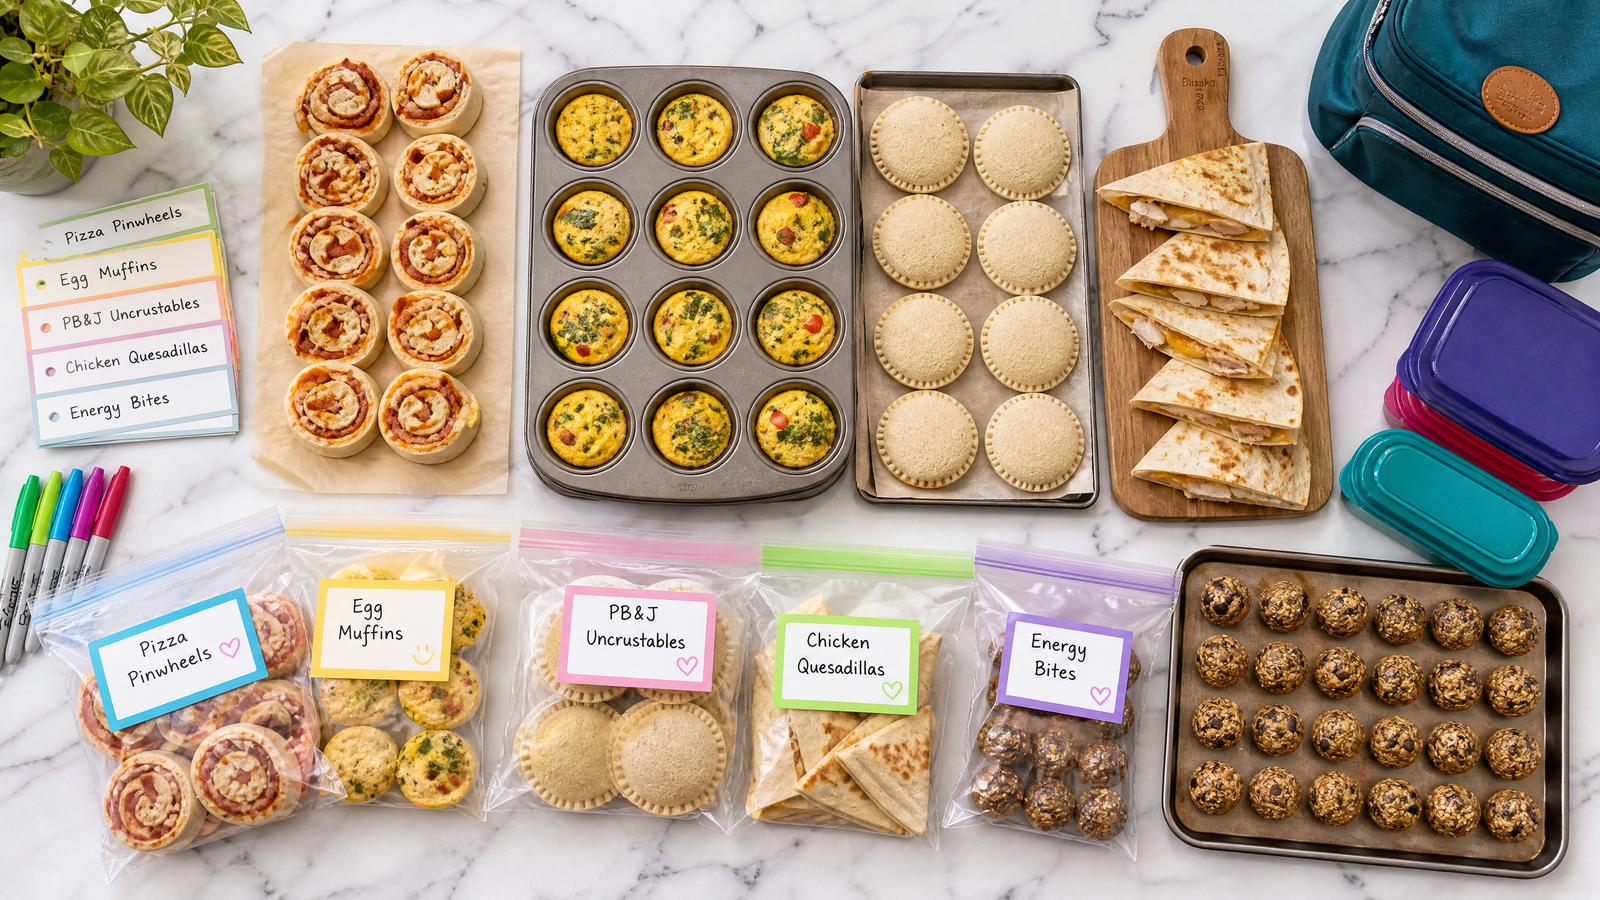
The secret to stress-free school mornings? A freezer full of ready-made lunches. Spend one hour on Sunday prepping these five kid-approved recipes, and you’ll have weeks of lunches ready to grab, pack, and go — no morning scramble required.
Every recipe here has been chosen because it freezes beautifully, thaws safely in a lunch box by noon, and — most importantly — kids actually eat them. Pair these with a great bento box from our Back-to-School Lunch Box Guide and you’re set for the entire school year.
(As an Amazon Associate, I earn from qualifying purchases at no extra cost to you.)
How Freezer Lunches Work
The concept is simple: you make a big batch on the weekend, freeze individual portions, and pull them out each morning. By lunchtime, most items have thawed naturally in the insulated lunch box — no microwave needed. Here are the golden rules:
- Freeze flat — Lay items in a single layer on a parchment-lined baking sheet first. Once frozen solid, transfer to labeled freezer bags. This prevents everything from sticking together.
- Label everything — Write the item name and date. Most items stay good for 2-3 months in the freezer.
- Pack frozen in the morning — Items will thaw by lunch. The frozen food also acts as an ice pack, keeping everything else cold.
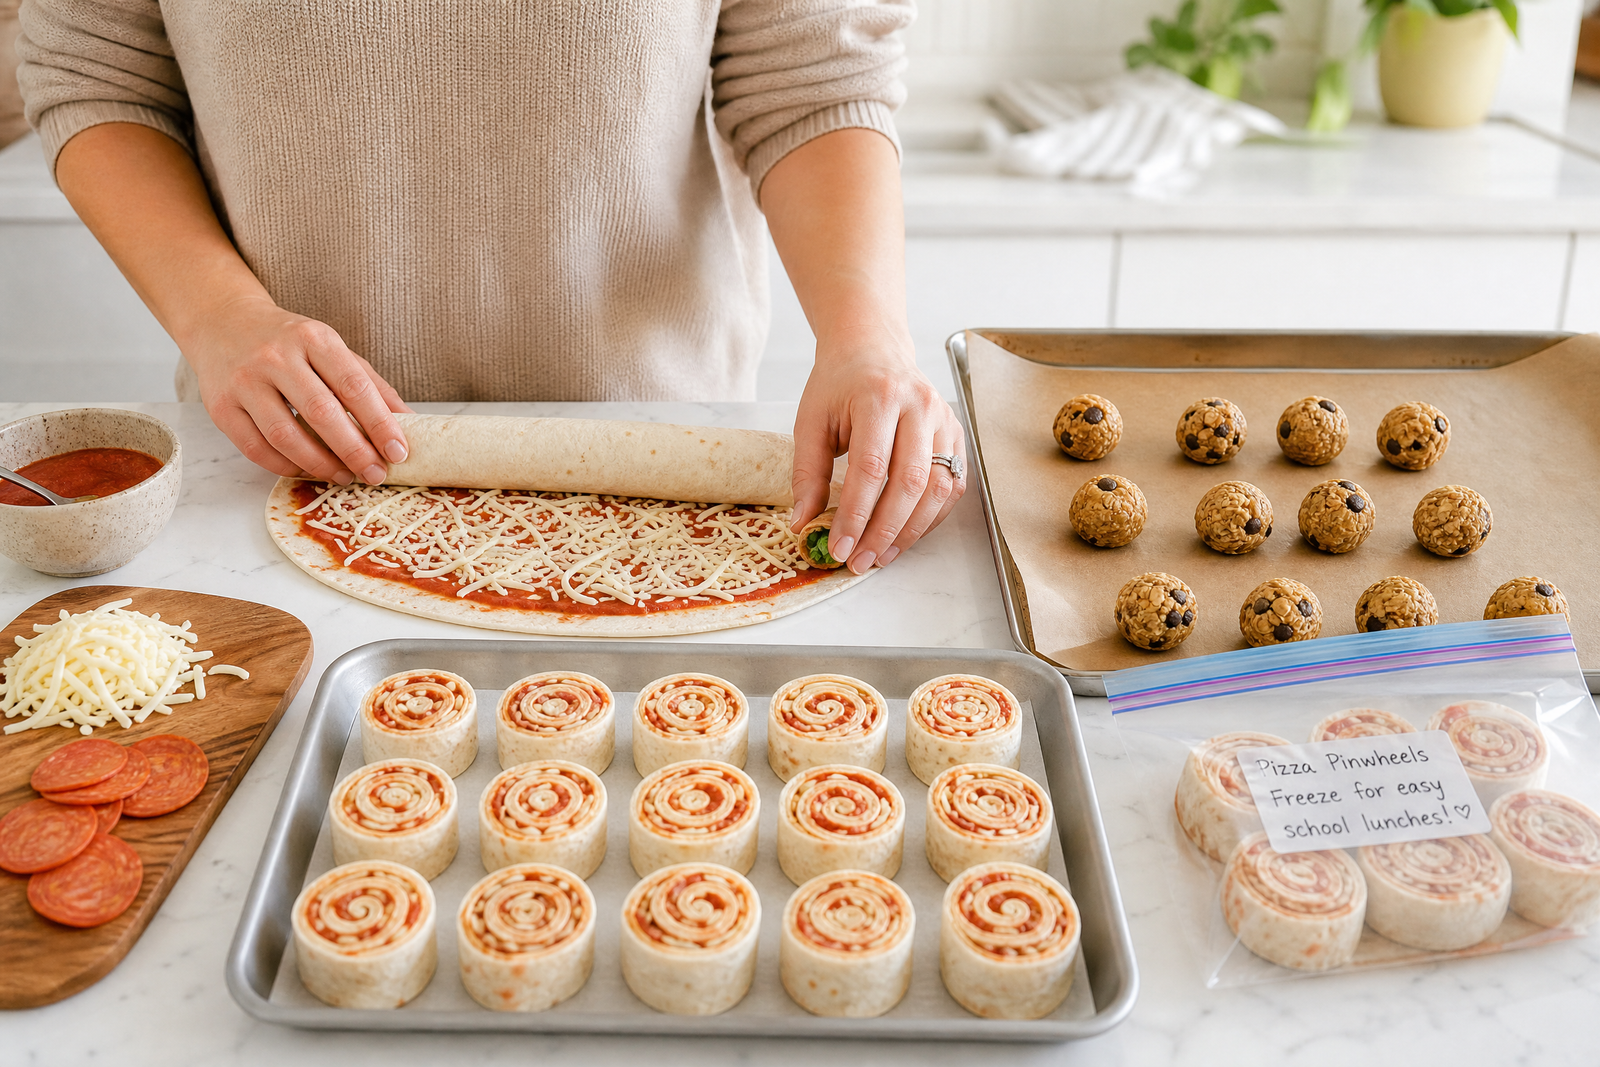
Recipe 1: Pizza Pinwheels
These are the lunch box equivalent of a standing ovation. Every kid loves pizza, and these pinwheels are easy to eat, fun to look at, and freeze like a dream.
Ingredients
- 4 large flour tortillas (10-inch)
- ½ cup pizza sauce
- 1½ cups shredded mozzarella cheese
- ½ cup mini pepperoni slices
- Optional: diced bell peppers, sliced olives
Instructions
- Spread 2 tablespoons of pizza sauce evenly over each tortilla, leaving a ½-inch border at the edges.
- Sprinkle mozzarella and pepperoni evenly over the sauce.
- Roll each tortilla tightly into a log. Wrap in plastic wrap and refrigerate for 30 minutes (this makes slicing easier).
- Slice each roll into 1-inch pinwheels (about 8-10 per tortilla).
- Place pinwheels flat on a parchment-lined baking sheet and freeze for 1 hour.
- Transfer frozen pinwheels to a labeled freezer bag. Keeps for up to 3 months.
Pizza Pinwheels
Ingredients
- 4 large flour tortillas 10-inch
- ½ cup pizza sauce
- 1 ½ cups shredded mozzarella cheese
- ½ cup mini pepperoni slices
- diced bell peppers or sliced olives optional
Instructions
- Spread 2 tablespoons of pizza sauce evenly over each tortilla, leaving a 1/2-inch border at the edges.
- Sprinkle mozzarella and pepperoni evenly over the sauce.
- Roll each tortilla tightly into a log. Wrap in plastic wrap and refrigerate for 30 minutes (this makes slicing easier).
- Slice each roll into 1-inch pinwheels (about 8-10 per tortilla).
- Place pinwheels flat on a parchment-lined baking sheet and freeze for 1 hour.
- Transfer frozen pinwheels to a labeled freezer bag. Keeps for up to 3 months.
Notes
Recipe 2: Mini Veggie Egg Muffins
Protein-packed, veggie-loaded, and perfectly portioned for little hands. These mini frittatas are endlessly customizable — use whatever veggies your kids will actually eat.
Ingredients
- 8 large eggs
- ¼ cup milk
- ½ cup shredded cheddar cheese
- ¼ cup diced bell pepper
- ¼ cup chopped fresh spinach
- ¼ teaspoon salt
- Pinch of black pepper
- Cooking spray
Instructions
- Preheat oven to 350°F (177°C). Spray a 12-cup muffin tin generously with cooking spray.
- Whisk eggs, milk, salt, and pepper in a large bowl until smooth.
- Divide diced veggies and cheese evenly among the muffin cups.
- Pour egg mixture over the veggies, filling each cup about ¾ full.
- Bake 15-18 minutes until puffed and set in the center (a toothpick should come out clean).
- Cool completely on a wire rack. Freeze individually on a baking sheet, then transfer to a freezer bag.
Mini Veggie Egg Muffins
Ingredients
- 8 large eggs
- ¼ cup milk
- ½ cup shredded cheddar cheese
- ¼ cup diced bell pepper any color
- ¼ cup chopped fresh spinach
- ¼ teaspoon salt
- pinch of black pepper
- cooking spray
Instructions
- Preheat oven to 350°F (177°C). Spray a 12-cup muffin tin generously with cooking spray.
- Whisk eggs, milk, salt, and pepper in a large bowl until smooth.
- Divide diced veggies and cheese evenly among the muffin cups.
- Pour egg mixture over the veggies, filling each cup about 3/4 full.
- Bake 15-18 minutes until puffed and set in the center (a toothpick should come out clean).
- Cool completely on a wire rack. Freeze individually on a baking sheet, then transfer to a labeled freezer bag.
Notes
Recipe 3: Homemade PB&J Uncrustables
The store-bought version can’t compete with homemade — and making a big batch takes less than 15 minutes. The secret to preventing soggy bread? Peanut butter on both sides acts as a moisture barrier.
Ingredients
- 1 loaf whole wheat sandwich bread
- 1 cup creamy peanut butter (or sunflower seed butter for nut-free schools)
- ½ cup strawberry or grape jam
Instructions
- Spread a thin layer of peanut butter on BOTH slices of bread (edge to edge — this creates a moisture barrier that prevents sogginess).
- Spread jam on one side, on top of the peanut butter layer.
- Press slices together. Use a round cookie cutter or a cup to cut into circles.
- Seal the edges by pressing with a fork all the way around.
- Place on a parchment-lined baking sheet and freeze for 1 hour. Transfer to a freezer bag.
Homemade PB&J Uncrustables
Ingredients
- 1 loaf whole wheat sandwich bread
- 1 cup creamy peanut butter or sunflower seed butter for nut-free schools
- ½ cup strawberry or grape jam
Instructions
- Spread a thin layer of peanut butter on BOTH slices of bread, edge to edge. This creates a moisture barrier that prevents sogginess after freezing.
- Spread jam on one side, on top of the peanut butter layer.
- Press slices together. Use a round cookie cutter or the rim of a cup to cut into circles.
- Seal the edges by pressing firmly with a fork all the way around.
- Place on a parchment-lined baking sheet and freeze for 1 hour. Transfer to a labeled freezer bag.
Notes
Recipe 4: Chicken & Cheese Quesadilla Triangles
Warm, cheesy, and satisfying — these quesadilla triangles are a lunch box hero. Kids love them cold or at room temperature, and they hold up beautifully after freezing.
Ingredients
- 4 large flour tortillas (10-inch)
- 2 cups shredded cooked chicken (rotisserie works great)
- 1½ cups shredded cheddar or Mexican blend cheese
- Optional: 2 tablespoons taco seasoning mixed into the chicken
Instructions
- Lay a tortilla flat. Spread ½ cup chicken and a generous handful of cheese on one half.
- Fold the tortilla in half, pressing gently.
- Cook in a dry skillet over medium heat for 2-3 minutes per side until golden and cheese is melted.
- Cool completely on a wire rack (this prevents sogginess).
- Cut each quesadilla into 3 triangles. Freeze flat on a baking sheet, then transfer to a freezer bag with parchment between layers.
Chicken & Cheese Quesadilla Triangles
Ingredients
- 4 large flour tortillas 10-inch
- 2 cups shredded cooked chicken rotisserie works great
- 1 ½ cups shredded cheddar or Mexican blend cheese
- 2 tablespoons taco seasoning optional, mixed into the chicken
Instructions
- Lay a tortilla flat. Spread 1/2 cup chicken and a generous handful of cheese on one half.
- Fold the tortilla in half, pressing gently.
- Cook in a dry skillet over medium heat for 2-3 minutes per side until golden and cheese is melted.
- Cool completely on a wire rack (this prevents sogginess from trapped steam).
- Cut each quesadilla into 3 triangles. Freeze flat on a parchment-lined baking sheet, then transfer to a freezer bag with parchment between layers.
Notes
Recipe 5: Banana Oat Energy Bites (No-Bake)
These no-bake bites are the perfect sweet treat that’s actually nutritious. Packed with oats, peanut butter, and a touch of honey, they satisfy that after-lunch sweet craving without the sugar crash. Kids can even help make these!
Ingredients
- 1½ cups old-fashioned rolled oats
- ½ cup creamy peanut butter (or sunflower seed butter)
- ⅓ cup honey
- ½ cup mini chocolate chips
- 2 tablespoons ground flaxseed
- 1 teaspoon vanilla extract
- Pinch of salt
Instructions
- Combine all ingredients in a large bowl and stir until everything is evenly mixed.
- Refrigerate the mixture for 15-20 minutes (makes it easier to roll).
- Roll into 1-inch balls (you should get about 24 bites).
- Place on a parchment-lined baking sheet and freeze for 1 hour. Transfer to a freezer bag.
Banana Oat Energy Bites
Ingredients
- 1 ½ cups old-fashioned rolled oats
- ½ cup creamy peanut butter or sunflower seed butter
- ⅓ cup honey
- ½ cup mini chocolate chips
- 2 tablespoons ground flaxseed
- 1 teaspoon vanilla extract
- pinch of salt
Instructions
- Combine all ingredients in a large bowl and stir until everything is evenly mixed.
- Refrigerate the mixture for 15-20 minutes (makes it easier to roll into balls).
- Roll into 1-inch balls (you should get about 24 bites).
- Place on a parchment-lined baking sheet and freeze for 1 hour. Transfer to a labeled freezer bag.
Notes
Your Sunday Prep Game Plan
Here’s how to make all 5 recipes in about 1 hour:
- Start the egg muffins (15 min prep + 18 min bake time — work on other recipes while they bake)
- Mix the energy bites and refrigerate (5 min)
- Assemble the PB&J uncrustables (10 min)
- Roll and slice pizza pinwheels (10 min)
- Cook quesadillas while rolling energy bites (15 min)
By the end of one hour, you’ll have enough lunches for 3-4 weeks. That’s dozens of school mornings where you don’t have to think about what to pack.
Tools That Make This Easier
Here are the tools I use for freezer lunch prep:
- Mini Muffin Tin — Buy on Amazon
- Round Cookie Cutter Set — Buy on Amazon
- Silicone Baking Mats — Buy on Amazon
- Freezer-Safe Storage Bags — Buy on Amazon
- Glass Storage Containers — Buy on Amazon
And don’t forget a great lunch box to pack them in! Check out our Ultimate Back-to-School Lunch Box Guide for our top picks.
Which recipe are you making first? Let me know in the comments — and tag me on Instagram if you try any of these!
All products recommended are items I’ve researched thoroughly and believe will genuinely help your family.


